
UPDATE: As of June 2022 Home Assistant is changing the way MQTT covers are defined in the yaml configuration files. I’ve updated this page to reflect the new way to configure MQTT covers. If you have followed this guide before September 2022, you may need to update your configuration so that it doesn’t break.
I just bought a bunch of Shelly devices to use with Home Assistant and wanted to use one to control my garage door. I’ve seen a few guides but they all seem to tell you to flash the device with Tasmota or ESPhome which seemed unnecessary seeing as I don’t have any other Tasmota/ESPhome devices (yet). I also haven’t used MQTT yet so this was a good opportunity to give that a go.
Prerequisites
To replicate my configuration, you’ll need the following things already running:
- Home Assistant server - I’m currently running 0.117
- An MQTT broker installed and running - I’m using the Mosquitto broker add-on.
- The MQTT integration installed and configured to use your MQTT broker.
- A Shelly 1
- A reed switch so that we can read the position of the garage door (optional)
Connecting the Shelly to power and the garage door opener
First we need to connect the Shelly 1 to the garage door opener. This can be be done on a bench for testing, but I just connected it to the garage door opener and left the relay wires disconnected during testing so that I wouldn’t be opening the garage door constantly.
This is a rough diagram of how I wired it up:
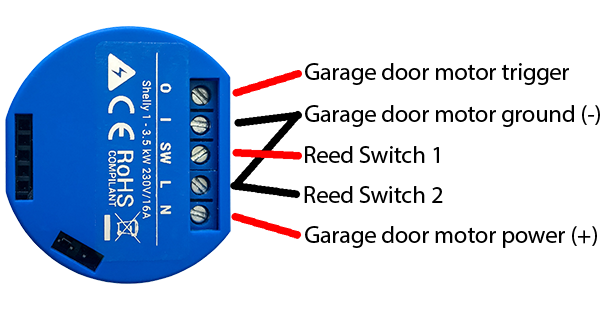
The I and O terminals are connected to the relay so one should be connected to the terminal on your garage door opener that will trigger the door to open, and the other should be connected to ground.
The SW terminal should connect to one wire from the reed switch, and the other wire from the reed switch needs to go to ground.
L and N provide power to the Shelly. L should be connected to ground, and N should be connected to the positive voltage (12V or 24V - 60V).
You will need to position the reed switch on your garage door so that it will be activated when the door is closed. This will vary depending on your garage door.
Once the power has been connected to the Shelly it should boot up and create a wifi network. Connect to the new Shelly network and browse to 192.168.33.1 so that you can configure it to connect to your home wifi.
Configuring the Shelly 1
Open the Shelly’s web interface. You’ll need to find the IP address from your router/DHCP server.
On the Settings page:
- Configure the Power on default mode to Off
- Configure the Button type to Detached Switch
On the Internet & Security page, open the Advanced - Developer settings section. You will need to configure the settings for your MQTT broker (Username, password and server address). I also set the custom MQTT prefix to Shelly-GarageDoor to make the MQTT topics easier to read.
On the Timers page, configure Auto Off to turn the relay off after 0.5 seconds. This means that when we trigger the MQTT topic, the relay will turn on, wait half a second and then turn off, simulating a button press.
That’s all that is required for the Shelly configuration.
Configuring Home Assistant
In Home Assistant we are going to use an MQTT cover to define and control the garage door so we need to add the following snippet to our configuration:
mqtt:
  cover:
    - name: "Garage Door"
      command_topic: "shellies/shelly-garagedoor/relay/0/command"
      state_topic: "shellies/shelly-garagedoor/input/0"
      qos: 0
      retain: false
      payload_open: "on"
      payload_close: "on"
      payload_stop: "on"
      state_open: "0"
      state_opening: "0"
      state_closed: "1"
      state_closing: "0"
- command_topic - This is the MQTT topic for controlling the Shelly
- state_topic - This is the topic to read the state of the reed switch connected to the Shelly
- retain - This tells the MQTT broker whether to keep the message after it was initially received. It is important to set this to false in this case because if your shelly restarts or reconnects to the network it will reconnect to the MQTT broker which will send the last retained command which will open your garage door.
- payload_* - These are the payloads to send to the command topic. They are all the same in my case as my garage door is controlled by a single button
- state_* - These are the states we expect to read from the state_topic
Remember to change the topics to match your configuration. If you configured your Shelly MQTT prefix to Shelly-GarageDoor the above configuration should work.
We also need to add a small customisation so that Home Assistant knows that this device is a garage door. Add the following to your customize.yaml file”
cover.garage_door:
  device_class: garage
Now you need to restart Home Assistant to load the new device.
Once Home Assistant has restarted, you can create a new entities card in Lovelace to allow you to control your garage door.

Comments
Joey
Great info, However are you getting any input from the Reed Switch? Do you get an Entity that ends in _input?
Tristan
Thanks. In home assistant the state of the garage door cover kind of shows the input from the reed switch, but if you wanted you could make another sensor that showed the state of the MQTT topic “shellies/shelly-garagedoor/input/0” (in my example) directly.
I hope that helps.
Mags
Hi Tristan, Is there any way so I could read the status of the reed switch that’s connected to Shelly 1 without the MQTT?
Tristan
Hi Mags, I don’t have any Shelly devices using the Shelly integration in Home Assistant any more but from memory the device in Home Assistant should show the state of the input/switch of the Shelly device. I’ve had a little look at the code for the integration on GitHub and it looks like it should show a binary sensor for the input, but I’m not able to test it to make sure.
Adrian
Mags
I have mine working with the Shelly Integration. Below is the Cover setup in HA:
cover:
NOTE: I have setup my Reed Switch so it tells me when the door is closed not open.
Also worth noting that you want to enable CoIoT on your Shelly and set the CoIoT peer to ::5683
(ie. set to UniCast and not Multi Cast.) This improves the refresh time for the reed switch status. It is then near instant where as if you leave it set to multicast it takes a while to change the open and close door logos.
Tristan
Hi Adrian, Thanks a lot for providing your solution! I’ll have to have a try at doing it this way when I get a chance. Cheers, Tristan
Leave a Comment
Your email address will not be published. Required fields are marked *